
Build a Bin, Boost Your Garden—The DIY Way to Start Composting

The Almanac Garden Planner - Use It Free for 7 Days!
Plan your 2025 garden with our award-winning Garden Planner.
Yes, your garden scraps can become free garden gold—but first, you’ll need that compost bin! This guide shows you how to build a simple DIY compost bin with step-by-step instructions and photos, making the process easy, fun, and totally doable.
By making your own compost, you can replenish nutrients in your garden’s soil at low cost and sustainably. Lucky for you, you can make a compost bin yourself. Here’s how!
Supplies Needed for a DIY Compost Bin
A compost bin can really be as simple or elaborate as you’d like, and the instructions below offer one possible design for an easy-to-build DIY compost bin that you can construct in an afternoon. The overall size of this specific design is 3 x 3 x 3 feet, which is about as small as you’d want to go. If you have room, you can easily make this bin larger to fit your needs by slightly adjusting the dimensions. (*See the safety note below.)
Read Next
The good news about this project is that it’s quite easy to make with basic tools and supplies that you may already have on hand.
Tools:
- 6” exterior screws
- 3½” exterior screws
- Wood glue
- 2 gate hinges, any style
- 2 hook-and-eye latches
- 3’ wide roll of hardware cloth (optional)
- 1” roofing nails (optional)
- 10 8’ 2x4s (standard stud) - Pine or cedar can be used here; treated lumber isn’t typically recommended for garden use
- A circular saw or a basic chop saw for easier cuts
- Pencil
- Tape measure
- Cordless drill for driving screws
- Tin snips (optional)
- Hammer (optional)
- Safety protection (ear protection, dust mask, safety glasses, etc.)
Lumber Cut List:
4 36” 2x4s
2 33” 2x4s
2 32¾” 2x4s
12 29” 2x4s
2 28⅞” 2x4s
3 26” 2x4s
3 25¾” 2x4s
Now you’re ready to start building! It’s going to be easy!
Making a Compost Bin: A Step-by-Step Guide
Step 1: Build the back wall
This compost bin is essentially a series of squares, pieced together into a cube. There is no bottom for this compost bin, and we’ll deal with the top later. So to start the project, we’ll focus on constructing the four walls.
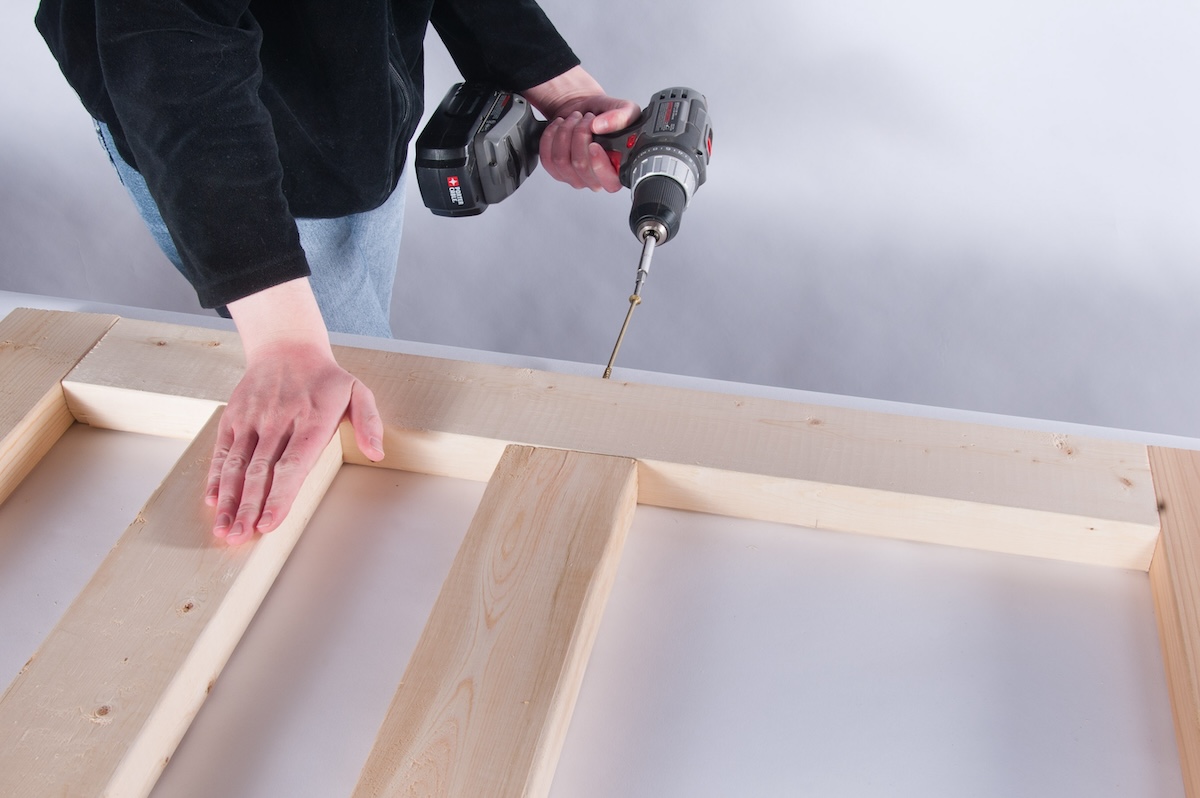
Constructing the back wall is quite simple; the only aspect that needs careful attention is the layout. On a large table (or the floor, if necessary), take a pair of 33” 2x4s and a pair of 26” 2x4s to create a square. You can fasten everything together with 6” screws—adding a dab of wood glue on each joint is also beneficial.


Once you have your square, add three more pieces to create a grill-like pattern. Place three 26” 2x4s inside the square as shown. You can measure and precisely space them, or you can just “eyeball” it—that will definitely be close enough for a compost bin. Attach with 6” screws.

Step 2: Build the side walls
Both side walls are identical, so these are easy to build one after the other. The idea is the same as the back wall you built in Step 1, just with pieces of slightly different dimensions. For the side walls, use a pair of 36” 2x4s and a pair of 29” 2x4s to create a square. Use 6” screws to fasten.


To finish it off, add three 26” 2x4s to make the same grill pattern as before, and use 6” screws here as well.

Step 3: Assemble what you have so far
Now you can begin constructing the bin itself. Stand up the back wall and your two side walls, construct a “U” shape, with the back wall “inside” the two side walls (if the overall width is 36 inches, you’ve got it right). This time, fasten with 3½” screws.


Step 4: Build the front door
Your front wall needs to function like a small door or gate. To make that work, the dimensions of the front wall are a tad bit smaller than the back wall. But once again the building process is the same: assemble a square using a pair of 32¾” 2x4s and a pair of 28⅞” 2x4s and fasten with 6-inch screws. Then make the grill pattern with three 25¾-inch 2x4s and screw these together as well. Finally, use the gate hinges to fasten the front door to the rest of the bin, and the hook-and-eye latches to keep it closed.


Step 5: Add hardware cloth (optional)
To keep mice, rats, raccoons, and other critters out of your compost bin, it helps to cover any openings with hardware cloth. This is helpful in urban areas, though not always needed if the compost bin is far enough from your house. To aid with critter control, you can cover each wall of the compost bin with hardware cloth, as recommended by Cornell University.
A 32 x 35” piece for each wall will work nicely; you can carefully cut the pieces from the roll with tin snips (wear gloves—the hardware cloth is sharp!).

Basic roofing nails (short, with a large head) can be used to tack the cloth in place. You don’t have to use wire, especially if you’re not composting food items, but it can help.

Step 6: Build the lid (optional)
Finally, you can build a top for the compost bin. As with the hardware cloth, not everyone chooses to do this, as it depends on your specific situation. If you’re trying to keep critters out, a lid can be helpful. And if your region is particularly rainy, a lid can help keep the compost from becoming drowned in excess moisture that can halt the composting process.
But some gardeners prefer to keep the lid off to allow for maximum airflow. If you’d like to make a lid, a simple piece of ½-inch plywood cut to a 3 x 3-foot square will work fine, and you can even mount it with the same type of hinges.

Or, you could use hardware cloth for the top. This would allow more for airflow. Or, you could build a more permanent lid out of lumber you already have on hand—whatever works best for you is the right choice.

Choosing A Location For Your Compost Bin
Your compost bin will work in sun or shade. The warmth of the sun might help speed up the composting process, but can also dry out your compost more quickly. For this reason, you might opt for some shade or partial shade.
Turning And Maintaining The Compost
It’s not just a matter of placing your composting components into the bin—you also need to do at least a small amount of maintenance to help stimulate the heat needed to encourage decomposing. Occasionally, maybe once or twice a week, you’ll want to take a pitchfork or shovel and flip the compost a few times. The idea is to aerate the compost pile and reintroduce oxygen back in to speed up the whole breaking-down process. This is called “hot composting.” You can also “cold compost” but it takes longer. (The University of California explains hot composting here.)

Troubleshooting Common Issues
Be sure to research exactly how to use a compost bin. There’s an excellent tutorial here. You want to be sure to aim for the ideal ratio of “browns” (carbon) and “greens” (nitrogen). The wrong percentages can cause your compost to fail or take a long time to decompose.
Enjoy this DIY compost bin activity? You may enjoy learning how to make our DIY Trellis!
Photos by Daniel Johnson.
* Note: It should go without saying that any activity using hand or power tools should be approached with due caution and safety in mind, and DIY projects are no exception. Always use caution when working on any construction project; safety should always be the priority. Read manuals and learn the safest ways to operate a table saw and your tools, and don’t ever place yourself in danger while working. DIY projects have the potential to be dangerous, and failure to exercise proper safety behaviors could result in injury or death. The authors and publisher cannot assume responsibility for any damage to property or injury to persons or property due to the use or misuse of the information provided.
Samantha Johnson


ADVERTISEMENT